spring boot 脑海里面已经记不得什么时候学的了,重刷这门课的时候之前也对着视频写了不少项目了,刷完谷粒商城这个大项目之后,突然觉得自己有必要回过头来重新学学 boot 了,而且最近有些许迷茫,具体的会在其他博客总结,总之不要让自己停下来,本文不是把所有的知识笔记一点一点的从头记录,而是查漏补缺,把常用而自己记得不太清楚的记下来
# @ConfigurationProperties
把配置文件里面的常量和 JavaBean 里面的变量进行绑定,注意 @ConfigurationProperties 和 @Component 两个注解缺一不可
/** | |
* 只有在容器中的组件,才会拥有 SpringBoot 提供的强大功能 | |
*/ | |
@Data//Lombok 注解,自动生成 get,set 方法 | |
@Component// 注入到容器中 | |
@ConfigurationProperties(prefix = "tencent.sms") // 配置文件里面的前缀目录 | |
public class SmsKey { | |
private String regionId; | |
private String keyId; | |
private String keySecret; | |
private String templateCode; | |
private String signName; | |
private String SmsSdkAppId; | |
} |
注入容器的时候会出现红色框框,而且在配置文件中自定义的配置没有代码提示,在 pom 文件中加入下面的代码解决 (参照官网),添加这个配置文件,在打包的时候记得取消打包这个,不然会把一些多余的类也打包进去,占用资源

<dependency> | |
<groupId>org.springframework.boot</groupId> | |
<artifactId>spring-boot-configuration-processor</artifactId> | |
<optional>true</optional> | |
</dependency> |
@component 给一个类注解,@bean 给一个方法注解
# 普通注解和基本注解
- @PathVariable 获取路径变量数据
- @RequestParam 获取普通参数数据
- @RequestHeader 获取请求头里面的数据 (带 key 就是指定 key 的数据,不带就是所有请求头的数据)
- @CookieValue 获取请求的 cookie 的数据 (带 key 就是指定 key 的数据,不带就是所有请求所有的 cookie 数据)
- @RequestBody 获取请求体,将前端传来的 json 数据封装成所需要的对象,以 json 格式传输数据 (如果是直接传普通的对象则不需要添加注解)
- @RequestAttribute 获取请求域里面的数据
# 自定义 WebMvcConfigure 的两种实现
- 在一个配置类中继承 WebMvcConfigure 的接口,然后在配置类中实现自定义方法
@Configuration | |
public class OrderWebConfiguration implements WebMvcConfigurer { | |
// 添加自己手动写的拦截器 | |
@Autowired | |
LoginUserInterceptor loginUserInterceptor; | |
@Override | |
public void addInterceptors(InterceptorRegistry registry) { | |
registry.addInterceptor(loginUserInterceptor).addPathPatterns("/**"); | |
} | |
} |
- 直接在配置类中放入想要自定义的实现类 (@Bean)
@Configuration | |
public class OrderWebConfiguration { | |
// 添加自己手动写的拦截器 | |
@Autowired | |
LoginUserInterceptor loginUserInterceptor; | |
@Bean | |
public WebMvcConfigurer webMvcConfigurer(){ | |
return new WebMvcConfigurer() { | |
@Override | |
public void addInterceptors(InterceptorRegistry registry) { | |
registry.addInterceptor(loginUserInterceptor).addPathPatterns("/**"); | |
} | |
}; | |
} | |
} |
# 内容协商 (@ResponseBody)
springMVC 可以根据客户端接收能力的不同,返回不同媒体类型的数据
# 引入 xml 依赖
 <dependency>
            <groupId>com.fasterxml.jackson.dataformat</groupId>
            <artifactId>jackson-dataformat-xml</artifactId>
</dependency>
# postman 分别测试返回 json 和 xml 数据
只需要改变请求头 Accept 的字段,HTTP 协议规定,告诉服务器本客户端可以接受的数据类型
# 内容协商原理
- 1、判断当前响应头中是否已经有确定的媒体类型。MediaType
- 2、获取客户端(PostMan、浏览器)支持接收的内容类型。(获取客户端 Accept 请求头字段)【application/xml】
- contentNegotiationManager 内容协商管理器 默认使用基于请求头的策略
- HeaderContentNegotiationStrategy 确定客户端可以接收的内容类型
- 3、遍历循环所有当前系统的 MessageConverter,看谁支持操作这个对象 (Person 对象)
- 4、找到支持操作 Person 的 converter,把 converter 支持的媒体类型统计出来。
- 5、客户端需要【application/xml】。服务端能力【10 种、json、xml】
- 6、进行内容协商的最佳匹配媒体类型
- 7、用支持将对象转为最佳匹配媒体类型的 converter,调用它进行转化
# 开启浏览器参数方式内容协商功能
spring: | |
contentnegotiation: | |
favor-parameter: true #开启请求参数内容协商模式 |
发请求: http://localhost:8080/test/person?format=json,转成 json 类型的数据,
http://localhost:8080/test/person?format=xml,转成 xml 类型的数据,开启之后会根据请求里面的 format 参数自动转成所需要的类型
# 自定义 MessageConverter (自定义内容协商)
在 webMvcConfigurer 中配置即可
@Bean | |
public WebMvcConfigurer webMvcConfigurer(){ | |
return new WebMvcConfigurer() { | |
@Override | |
public void extendMessageConverters(List<HttpMessageConverter<?>> converters) { | |
} | |
} | |
} |
# 拦截器
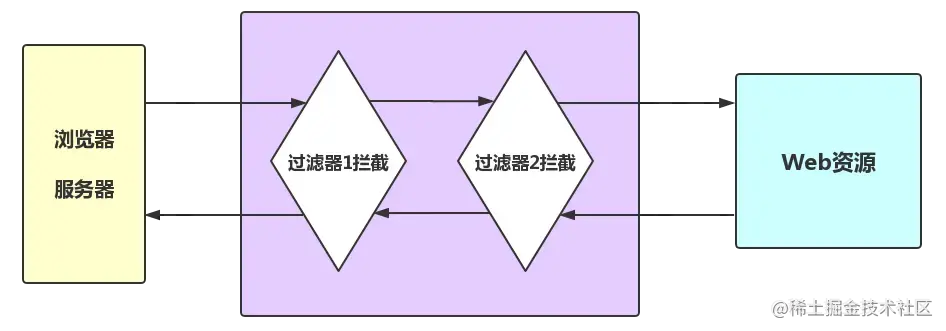
# Servlet 原生过滤器

- 链接过滤器链的操作流程
- 如果放行之后不想让线程进行执行后面的代码,则需要 return,在过滤器里面判断登录和拦截资源
@WebFilter()//拦截路径,对什么进行拦截
public class Filter implements javax.servlet.Filter  {
    @Override
    public void init(FilterConfig filterConfig) throws ServletException {
        javax.servlet.Filter.super.init(filterConfig);
    }

    @Override
    public void doFilter(ServletRequest servletRequest, ServletResponse servletResponse, FilterChain filterChain) throws IOException, ServletException {

    }

    @Override
    public void destroy() {
        javax.servlet.Filter.super.destroy();
    }
}
# HandlerInterceptor 接口
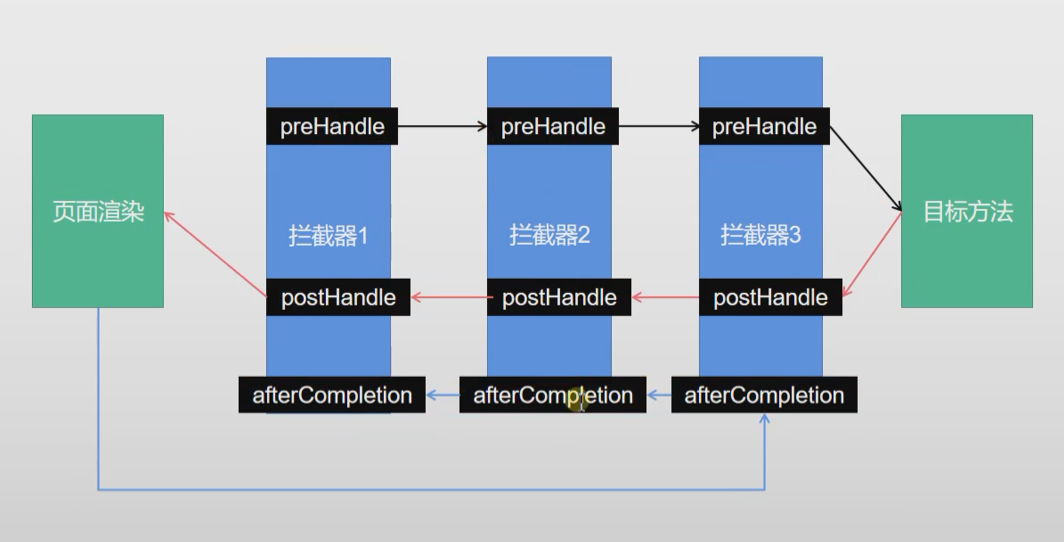
实现拦截器的两个步骤
- 编写一个拦截器 HandlerInterceptor 接口,Interceptor 是 spring 家定义的接口,可以实现自动注入 @Autowired
- 拦截器注册到容器中 (实现 WebMvcConfigurer 的 addInterceptors,addInterceptors 的时候可以 new 一个,也可以 Autowired 一个然后自动注入)
- 指定拦截规则 (如果是拦截所有,静态资源也会被拦截)
/** | |
* 登录检查 | |
* 1、配置好拦截器要拦截哪些请求 | |
* 2、把这些配置放在容器中 | |
*/ | |
@Slf4j | |
public class LoginInterceptor implements HandlerInterceptor { | |
/** | |
* 目标方法执行之前 | |
*/ | |
@Override | |
public boolean preHandle(HttpServletRequest request, HttpServletResponse response, Object handler) throws Exception { | |
String requestURI = request.getRequestURI(); | |
log.info("preHandle拦截的请求路径是{}",requestURI); | |
// 登录检查逻辑 | |
HttpSession session = request.getSession(); | |
Object loginUser = session.getAttribute("loginUser"); | |
if(loginUser != null){ | |
// 放行 | |
return true; | |
} | |
// 拦截住。未登录。跳转到登录页 | |
request.setAttribute("msg","请先登录"); | |
// re.sendRedirect("/"); | |
request.getRequestDispatcher("/").forward(request,response); | |
return false; | |
} | |
/** | |
* 目标方法执行完成以后 | |
*/ | |
@Override | |
public void postHandle(HttpServletRequest request, HttpServletResponse response, Object handler, ModelAndView modelAndView) throws Exception { | |
} | |
/** | |
* 页面渲染以后 | |
*/ | |
@Override | |
public void afterCompletion(HttpServletRequest request, HttpServletResponse response, Object handler, Exception ex) throws Exception { | |
} | |
} |
- 拦截器执行的流程图

# 异常处理
# 定制错误处理
- 自定义错误页
- error/404.html error/5xx.html;有精确的错误状态码页面就匹配精确,没有就找 4xx.html;如果都没有就触发白页
- @ControllerAdvice+@ExceptionHandler 处理全局异常;底层是 ExceptionHandlerExceptionResolver 支持的
// 统一异常处理类 | |
@ControllerAdvice | |
public class GlobalExceptionHandler { | |
@ResponseBody | |
@ExceptionHandler(Exception.class) | |
public ResultData error(Exception e){// 统一异常的通用处理 | |
e.printStackTrace(); | |
return ResultData.error(); | |
} | |
@ResponseBody | |
@ExceptionHandler(GuliException.class)// 自定义异常处理,自定义 GuliException | |
public ResultData error(GuliException e){ | |
e.printStackTrace(); | |
return ResultData.error().code(e.getCode()).message(e.getMsg()); | |
} | |
} |
# Web 原生组件注入 (Servlet、Filter、Listener)
# 使用 Servlet API
在主启动类上加 @ServletComponentScan (basePackages = "com.atguigu.admin") : 指定原生 Servlet 组件都放在那里,然后在对应的类上加不同的注解,
@WebServlet (urlPatterns = "/my"):效果:直接响应,没有经过 Spring 的拦截器
@WebFilter(urlPatterns="/css/*")
@WebListener
# MyBatis-Plus 分页查询
Page 继承了 Ipage
# Profile 功能
为了方便多环境适配,spring boot 简化了 profile 功能
- 默认配置文件 application.yaml; 任何时候都会加载
- 指定环境配置文件 application-{生产环境}.yaml
- 激活指定环境
- 配置文件激活
- 命令行激活: java -jar xxx.jar --spring.profiles.active=prod (可以任意修改)
使用此功能,打包的时候使用不同的生产环境,开发时用测试环境,打包时用生产环境
# 参考文档
雷神手敲笔记